One of the first tasks I had in mind was making this Pi accessible from anywhere, allowing me to work with it on the go. Any time I have an idea I can just give it a try without the need to be at home.
To get my Pi online I’ve used the following technologies: port forwarding, domain name settings, cloudflare as a dns provider, little bash script that updates IP address using cloudflare API. It sounds like a lot and it is. But fear not! I will take you through the setup step by step. We’ll start with allowing remote access using SSH.
Setting up SSH server (allowing Remote Access)
To access the Pi remotely, the SSH server needs to be running. If you’re using Raspbian, then by default the ssh server is disabled. You can enable ssh with the command sudo raspi-config. You should now have the sshd server running, listening for on the network for remote logins.
Local Area Network (LAN) access
Next task is to get your internal (within your LAN) IP address, it should be something like 192.168.XX.XXX, now try connecting to your raspberry from another computer at home, that is connected to the same network (just use internal IP address and port 22.
Once you got LAN bash console running, don’t forget to make Pi’s ip address static (so IP address doesn’t change after reboots). This is usually done on your router.

Undestanding DDNS
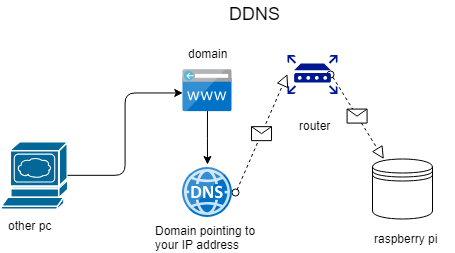
Chances that you have static public IP address at home are little. Usually it is dynamic, that means your internet service provider (ISP) is assigning you different public IP address every so often. To connect to your Raspberry PI from the outside world you will need to know its public IP address, but the address is changing at random… So you need something static (like a domain name), that would point to your public IP address, and every time your ISP changes IP it needs to update itself… People tend to call it “Dynamic DNS” or “DDNS”.
Domain
Domain name that points to your public IP address and updating itself every so often (Domain DDNS) can be achieved by using separate service or you can totally DIY. Let’s do it! Domain names are cheap and look professional.
I’ve used ddns.net first, it works, but just about it. My ddns domain name was assigned, but I found that it is not easy to manage and I had problems with SSL certificates on my website, therefore I’ve just moved to my own service that is much simpler and easier to maintain.
In general DNS looks like this, dynamic DNS or ddns looks exactly the same, but will update IP address that is pointing to your pi every so often. Simple, right?

Next big thing is DNS provider that would allow to rewrite IP address using application programming interface (API) and has little cache time. I found Cloudflare, it is free and OK for this tasks.
I’m on a budget and trying to do free as much as possible. I do not plan to run some banking web service on my Raspberry Pi. Even if my Raspberry Pi is not accessible for 10-20 minutes, I’m OK with that.
little check list is below:
- Go to Cloudflare website, register, add domain and follow instructions
- Go to Domain name registrar panel and change NS servers to Cloudflare, as instructed
- Once Cloudflare accepts your domain you will receive an email
- Add DNS record type “A” that is pointing to your public IP address (by hand this time)
- Change TTL (cache time) to 2 minutes (this will allow you to change IP address relatively fast)
- Do not turn on cloud yet (yellow cloud icon next to a record)
Port forwarding
On your router you will need a few ports to be open, like http is usually port 80, https is 443, ssh is 22 (these are defaults, you sure can reassign those). Once done you will be able to open an ssh connection by using the domain name and port 22.
To connect to the ssh server from home type
ssh <your login name>@<Pi's IP address> -p 22
Script to update IP address
Logic is:
1. Get your public IP address
2. Check if it has changed since last check
3. If changed – push new IP address to the cloudflare
To start with something, here is a bash script that can help a lot:
Once this is working and doing what it should from a console, just CRON this to every 2-20 minutes depending on how fast you need for changes to take place. Zone update goes only if IP address changes, so it is fine to run it many times locally, no harm will be done to cloudflare and they are not going to block you.

